• Dana Arts
  • Collections
    • Animal Inspired
    • Beaded Jewelry
    • Bracelets
    • Celtic Inspired
    • Charms
    • Chokers
    • CTR Rings
    • Earrings
    • Engagement Rings
    • Faces
    • Flag Rings
    • Gold Bands
    • Greek Inspired
    • Hawaiian Inspired
    • Impressions of Nature
    • Laotion Inspired
    • Mission Rings
    • Necklaces
    • Pendants
    • Paradise
    • Patterned Bands
    • Steampunk Inspired
    • Custom
  • Photography
  • Crafts
  • Still
  • CAD
  • Details
    • Policies
    • FAQ
  • About
    • About Me
    • Contact
  • Blog
  • Pricing
  • Scheduling
  • Account/Login
Dana Arts

The Art of Handcrafted Art

  • Dana Arts
  • Collections
    • Animal Inspired
    • Beaded Jewelry
    • Bracelets
    • Celtic Inspired
    • Charms
    • Chokers
    • CTR Rings
    • Earrings
    • Engagement Rings
    • Faces
    • Flag Rings
    • Gold Bands
    • Greek Inspired
    • Hawaiian Inspired
    • Impressions of Nature
    • Laotion Inspired
    • Mission Rings
    • Necklaces
    • Pendants
    • Paradise
    • Patterned Bands
    • Steampunk Inspired
    • Custom
  • Photography
  • Crafts
  • Still
  • CAD
  • Details
    • Policies
    • FAQ
  • About
    • About Me
    • Contact
  • Blog
  • Pricing
  • Scheduling
  • Account/Login

What are we doing with our time?

Some of us may be very busy working extra hard during these hard times while others are having a little more difficulty losing their work. I feel I’m in the middle. With some extra time that I have on my hands I have taken on many projects. The latest has been my coil cooking pot with clay I gathered from Honey Run Creek in Paradise California. It’s from behind the house I grew up in. So far the pot has taken shape and it seems to be great grey clay. The process is fun. I crush the clay into a powder and then I usually add sand to it, but testing this out I didn’t add anything to it (accept for water). I then mix it and knead it until it feels like the right texture and softness. I start with a base and then start adding coils. As I add each coil and smooth it out the pot starts to take shape. After each layer I analyze it and hit it into shape quite literally. As the bottom part dries I start smoothing it with a knife or smooth piece of wood. Once finished and the pot holds it’s shape, I start smoothing it out all over. When I’m satisfied I set it aside to dry for a few days. The next step would be to fire it in a fire. I like to use a combo of wood and cow dung. It then is hardened in the fire and can then be used to cook with.

Paradise CA coil pot


In life we are like clay. The situations around us are happening and we choose how to react to those situations. We are getting molded and shaped and smoothed out. I feel as we make righteous choices we are able to progress in ways that help us grow into better people. Each coil is another layer that makes us closer to being whole or the best we can become. Serving others, helping when able, loving your neighbor, working hard in society, and just being kind are all things that will help us on our journey to becoming better. So what are we working on today? Are we improving ourselves? Are we growing in ways that lead us into something whole? Are we building and smoothing and becoming a completed clay vessel that is good and beautiful from within?

I hope to do more projects with more time on my hands. I feel it’s good to keep moving forward and building us and others up in good ways. Let us not stand still and waste our time away, but continue on a course of progression throughout our lives that will make us whole and as complete as we can be.


tags: Paradise California, Paradise, clay pot, cooking pots, coil cooking pot, handmade pot, Paradise camp Fire, clay, Pottery
categories: Updates, Outdoor Survival topics
Tuesday 04.07.20
Posted by Dana Thorup
 

Ring Design

I recently had someone at the Arizona Bridal Show ask me what inspires my designs. I love designing rings. There are many ways to create or come up with a new design. Personally I go through stages and work with different methods to get ideas or to just jump in and design. I’ll try and explain a few of these stages I go though.

  • Lately I have not looked for ideas or inspiration and just open up something like sketchbook pro (which is now free to everyone) where I then turn on symmetry and sketch out a pattern. Unfortunately most of my drawings look better as a sketch than turned into 3d. Once in 3d though I can see it and make changes as needed as I develop the idea. This method is fun and my mind can be free. Most patterns sketched in this method just come from my head. There is no other way to put it. My ideas are inspired by more ideas as I just start sketching patterns.

Sketch idea for another band

Sketch idea for another band

Sketch idea for band

Sketch idea for band

  • So that leads me to sometimes just opening up my CAD (computer aided design) program and pull out a blank band to just start playing with ideas. This method takes longer at times. I sometimes just take old patterns and change them up and start to put them on the ring. From there things just start happening and I guess each object that I add develops into the next one until its done. This I feel I have lots of freedom to push and pull to my satisfaction. Zbrush is another program that I use to sculpt and am allowed to be free with my ideas.

  • Another method is to browse the internet. I love just looking at nature patterns. Some ideas come from floral wood carvings. Sculpture and other crafts that have great talented people. Lots of times these large pattern I see inspire me to make something similar, but on a smaller and more simplified way. you can only pack so much detail into such a small thing such as a ring.

  • Sometimes inspiration comes from just being with family or going out. As I see a pattern on someones clothing or I see a rug with a cool pattern, or a cool pattern in the tree bark. So many ways to come up with ideas. I will usually just try out and play with the ideas that jump out at me. That is called inspiration. I get excited and that is when I start to experiment with those ideas. From there it leads to one of the methods above like sketches or just jumping into CAD.

So there you have it. Those are some ways I design when inspired to create. Here are some rings that I will be adding to my site soon. I just need to photograph them and add them to my site. This does take a while, but then that gives you something to look forward to, right?

Some New Designs I have not fully added to my website yet.

Some New Designs I have not fully added to my website yet.

tags: Ring Design, Jewelry Design, inspiration, design and inspiration, Patterned bands, wedding bands, sketches, sterling silver bands
categories: All Jewelry Related, New design, Updates
Monday 02.03.20
Posted by Dana Thorup
 

Bridal Show and Craft Fairs

So I’m always trying to improve. I am always pushing and pushing to grow my business and most of the time feels like I’m having fun even if it’s not really growing. As long as I’m enjoying the ride, I think that is what’s important.

So I’ve decided to try something new. For those that have never seen my art in person, now’s your chance. December 21st 2019 I will be in a 10 x 10 booth over at the Queen Creek Family Market. 21802 S Ellsworth Rd., Queen Creek, AZ 85142 which is outside the Queen Creek Library. Come and enjoy looking around and pass by if you’d like to see some of my rings and other crafts on display. It’s open from 9am to 2pm and it’s a Saturday.

I will have some new makeup bags or whatever you want to put in them bags available along with many other products. I so wish I had more time to make more, but I’ll bring what I can. :)

New Makeup Bags.

New Makeup Bags.


Also I will be going to a bridal show over in the Phoenix Convention Center. This will be January of 2020 on the 11th and 12th. I’m in booth #644. Come by if you’d like to see or try on some rings. It will be a fun time. Mark your calendars. I think it’s $12 to get in.

This is something new to me and I don’t have it all figured out yet. This is one way I’m pushing myself to grow. I could use your support if you will be around during those busy times of year. I’ll post about this again as it gets closer to the event, but I just wanted to get this out early on so you can plan for it. :)


Find me at Booth #644

Find me at Booth #644

tags: Arizona Bridal Show, Queen Creek Family Market, Dana Arts, Craft shows, Craft Fairs, Bridal Shows, Dana Arts Jewelry, Dana Arts rings, engagement rings, wedding bands, jewelry and crafts
categories: All Jewelry Related, Updates
Thursday 12.19.19
Posted by Dana Thorup
 

Beads and Necklaces

I just love old trade beads. There is something about them that makes me inspired and excited to start creating. I have not done so in a very long time. I pulled out a few beads and it’s starting again. I am wanting to start creating more necklaces with my beads. Some past chokers that I use also have inspired me to make more of them too. Let’s hope it’s enough to push me into action. lol. It’s so relaxing to make them though. I have, off and on, been making beaded necklaces since high school around 30 years ago. It’s more of a hobby, but I can only make so many for myself, right? So as start up again, I’ll start to add them to my site so if you don’t feel up to making them you can just buy them. :)

There are so many cool beads out there. I do my best to make a strong and durable product. I think over the years making jewelry for a living has really helped me develop my skill set as a craftsman. I feel I don’t have to worry so much about the tools and how to go about it. It’s now more about that I have the skill set so what do I create? Anything is possible as long as I have the supplies and imagination. As I’ve gone through my beads I feel that I really don’t have that many. At least not as many as I wish I had. They are quite expensive, but it’s like a bug. I could spend money on beads just because they look cool to me and never use them for anything. So terrible! Well I hope I can start creating something with what I have so it’s not sitting around anymore and so I can go out and buy more. :)

Old looking beads of glass and stone

Old looking beads of glass and stone

Here are some of the chokers. The first two in the image are mine from years and years back. I love wearing them even though I get a few strange looks around town. The blurred one in the background is a four strand brass bead, bone and leather choker. I strung it with real sinew cordage that I made. It’s very nice. I hope to vary these up and make a bunch more. These are fun to make and they last a very very long time. Soon I’ll have some available for purchase. Let me know if you have any ideas on a choker that you may like and I’ll see what I can do. That’s it for this month. Just trying to find time to create. Life gets in the way sometimes and it’s hard to get the time I need to be creative. I guess a little here and there is better than nothing. :)

Bone, Brass, and leather chokers

Bone, Brass, and leather chokers

tags: Trade beads, Stone Beads, chokers, Indian choker, bone choker necklace, wide choker, primitive chokers, old chokers
categories: Crafts, All Jewelry Related
Friday 09.20.19
Posted by Dana Thorup
 

Handmade Bracelets

I have some handmade bracelets I made years ago. I learned how to make these from a book that showed how to make loop n loop style links. I modified some of them to work with what I had. The last image shows a bangle bracelet that I learned how to make while living in Lao P.D.R. So let me explain how I made these because I will probably only ever make another as a hobby or when I have a lot of spare time. First the tapered woven bracelet.

Loop n Loop fine silver

Loop n Loop fine silver

This woven bracelet I made from scratch. I mean that I did not order the wire from a jewelry manufacturer and then build it. I took fine silver coins. That’s .999 fine silver. It’s best to work with fine silver because it’s softer and will weld a lot easier for this style of bracelet. Believe me when I tell you these links go through a lot to be woven together and that softness or malleability goes a long way. So I melt the coins down and pour them into an ingot. I then roll out the silver into a square ingot. As I roll it through the mill the square ingot slowly becomes longer and longer. I have to re heat the silver to a glowing red color to anneal it every time it passes a few times through the mill. Eventually it becomes smaller and smaller in diameter. I then reach a point where I can then start pulling it through draw plates. This rounds out the now wire and I can continue the process of drawing and annealing the wire until I reach the desired thickness or diameter of wire I need. In this case for the tapered bracelet I needed a lot of sizes and I had to stay organized especially once I started to make the rings. So the next step was to make all the little rings that would get woven together. Once I make them I have to align each seam and weld (not solder) each seam together with a torch.

Now to start weaving. I next have to crush the circle with pliers in order to push them through the other links that I’m creating. Once I push one end through I have to un crush it and round the end back out for the next crushed or flattened link to pass through. With all that abuse I have to anneal it every now and then otherwise at times the welded seams break from all the stress put on them. When that happens I have to back track a few links to remove it and then continue on to make the bracelet. As you can see this tapered bracelet had to be organized to keep matching sizes on both sides so it could taper and also be even once the desired length was reached. No small task.

Handmade from scratch

Handmade from scratch

Next I had to build the end caps. They were also handmade from scratch. After rolling out some small sheet I made the caps and also domed the very end of it. I also made the little pieces and soldered them on for decoration. The clasp was no different. I had to hammer the end out or draw it out to a point so I could then curl the hook. After the end caps get soldered on the woven bracelet I have to polish it. After polishing I used a technique I learned in Laos to darken it with bees wax. Again, so much work is involved that I probably will never make another. Fun, but time consuming and only for enjoyment.

The other bracelet or bangle bracelet was also made in a similar way or at least the wire making was the same. Then I use a solid piece of silver to make the bangle and use twisted wire that is wrapped around it to create the pattern you see. I love how they turn out. I will probably still make these bangles as long as I purchase pre-made wire to work with.

There are other styles of loop n loop bracelets. I learned how to do the woven or crochet version with silver wire while staying in Laos. That is also fun to make. They are made of one wire and it can be round or flattened. This is usually made with thinner wire so it can be crocheted easier. The thicker ones are best to be done the traditional way as a true loop n loop style as I explained above.

So where did this originate? I’ve read that it is of Greek or Etruscan origins, but that is a whole different story that you can do a little research on.

So there you have it. A wonderful craft that is fun to do. I truly love making wire and it’s fun. It is very time consuming though and I can only leave that for special relaxing time away from business. If you are a purist then these few bracelets are just that. From scratch. The future will force me to be less pure from scratch and start using factory made wire which makes me sad, but also enables me so sell them at a more affordable price. Comments are welcome.

Handmade Solid Sterling Silver Bangle Bracelet

Handmade Solid Sterling Silver Bangle Bracelet

tags: Silver Bracelet, Woven bracelet, handmade bracelet, greek bracelet, the art of bracelets
categories: All Jewelry Related
Friday 07.19.19
Posted by Dana Thorup
 

Square Rings

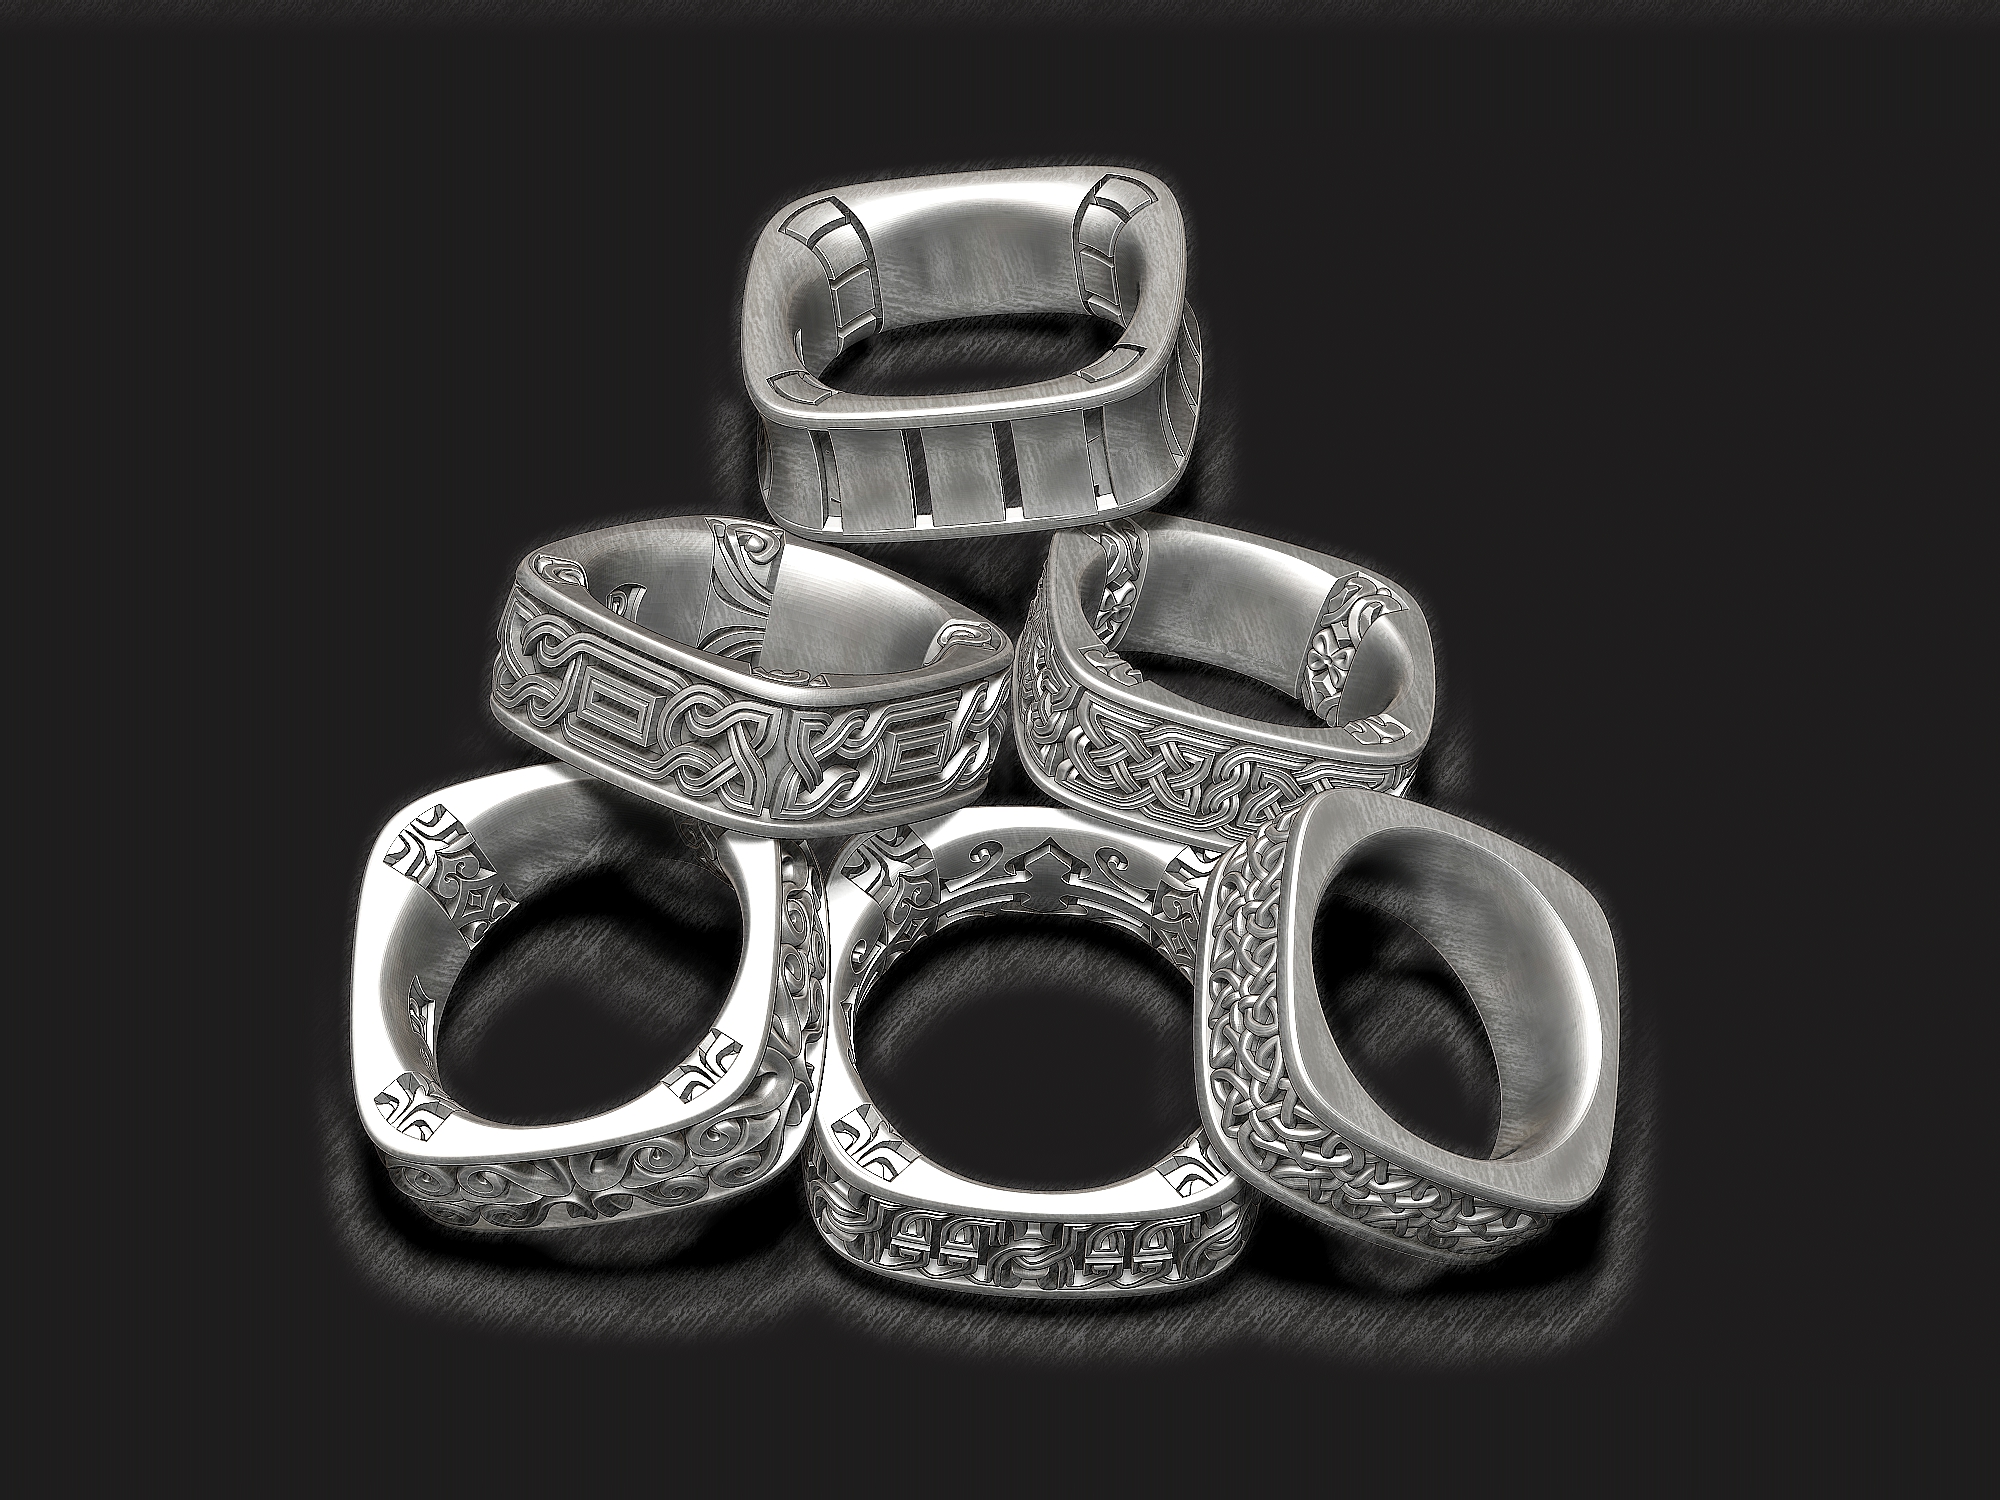
So today I wanted to talk about square rings and how they can be comfortable and stylish. I have been designing rings that have four showing sides. Sometimes a little rounded and other times more flat. The neat thing about them is that they are actually very comfortable to wear. The band is thin between the fingers and the corners get quite a bit thicker. These types of rings don’t tend to spin around the finger and have a nice weight and feel to them. Square shank bands are a bit eye catching too since most people are use to seeing a round ring. Square rings although have flat sides on the outside, the inside of them are still round to slide onto the finger as a traditional round ring would. Here are a few examples of square rings (see image below).

Examples of Square Rings

Examples of Square Rings

The Loopy Celtic knot ring that you see below is packed with detail on both the inside and outside of the ring. Even though you don’t see the patterns on the inside while wearing the ring, just knowing that it’s there makes it cool. When someone wants to see it you take it off and show all the extras that come with this band. It can be worn as just a great stylish ring or even for a wedding band. My bands are not usually gender specific. Male or Female can wear them. Most of my patterned bands are a little wider than some people are use to. Around 8mm to 10mm wide. They are this wide so that a pattern can be made in greater detail. For thin bands the pattern has to stay simple, but I like how the wider bands can show lots of detail and they also have a nice weight to them. That’s something you want in a ring. Thin rings tend to bend and wear a lot faster, but a well made band will be thick enough to be comfortable yet strong enough that it won’t bend the first time you drop it or bump it. These rings are some of my favorites.

Loopy Celtic knot ring

Loopy Celtic knot ring

If you are ever looking for some unique style bands just check out my inventory. I’m about ready to swap out my wedding band to one of these. I also make them in 14k gold even when not listed on my site. Just ask for a quote if ever interested in a ring that is not in gold yet.

Well I love designing rings with patterns and as you can see I have a whole site dedicated to this. I design them in CAD software and that is like a master mold of that ring. I get inspired to create new designs by many ways. The usual way will be to just start building. I start playing around with different ideas and objects that I create until something works out. Yeah there are times I go back and look at old designs and I’m no longer happy with them. Those rings I don’t really know what to do with. They usually just sit there. Hopefully the better designs are the ones that over time I feel are still great designs. The better designs will stick around. I don’t believe in discontinuing rings. I would rather just keep an archive of all my rings and so they are always available even years down the road. Have you ever lost a ring and can’t get an original again? Well with me I’ll always keep the design available and if I accidentally remove it, just contact me and I’ll find it.

So that is a little bit about me and my designs. The square rings are my favorites right now so check them out and maybe there is something in there for you. :)

tags: Square rings, Square bands, Square shank rings, Patterned bands
categories: All Jewelry Related, New design, Updates
Monday 06.24.19
Posted by Dana Thorup
 

Blacksmithing

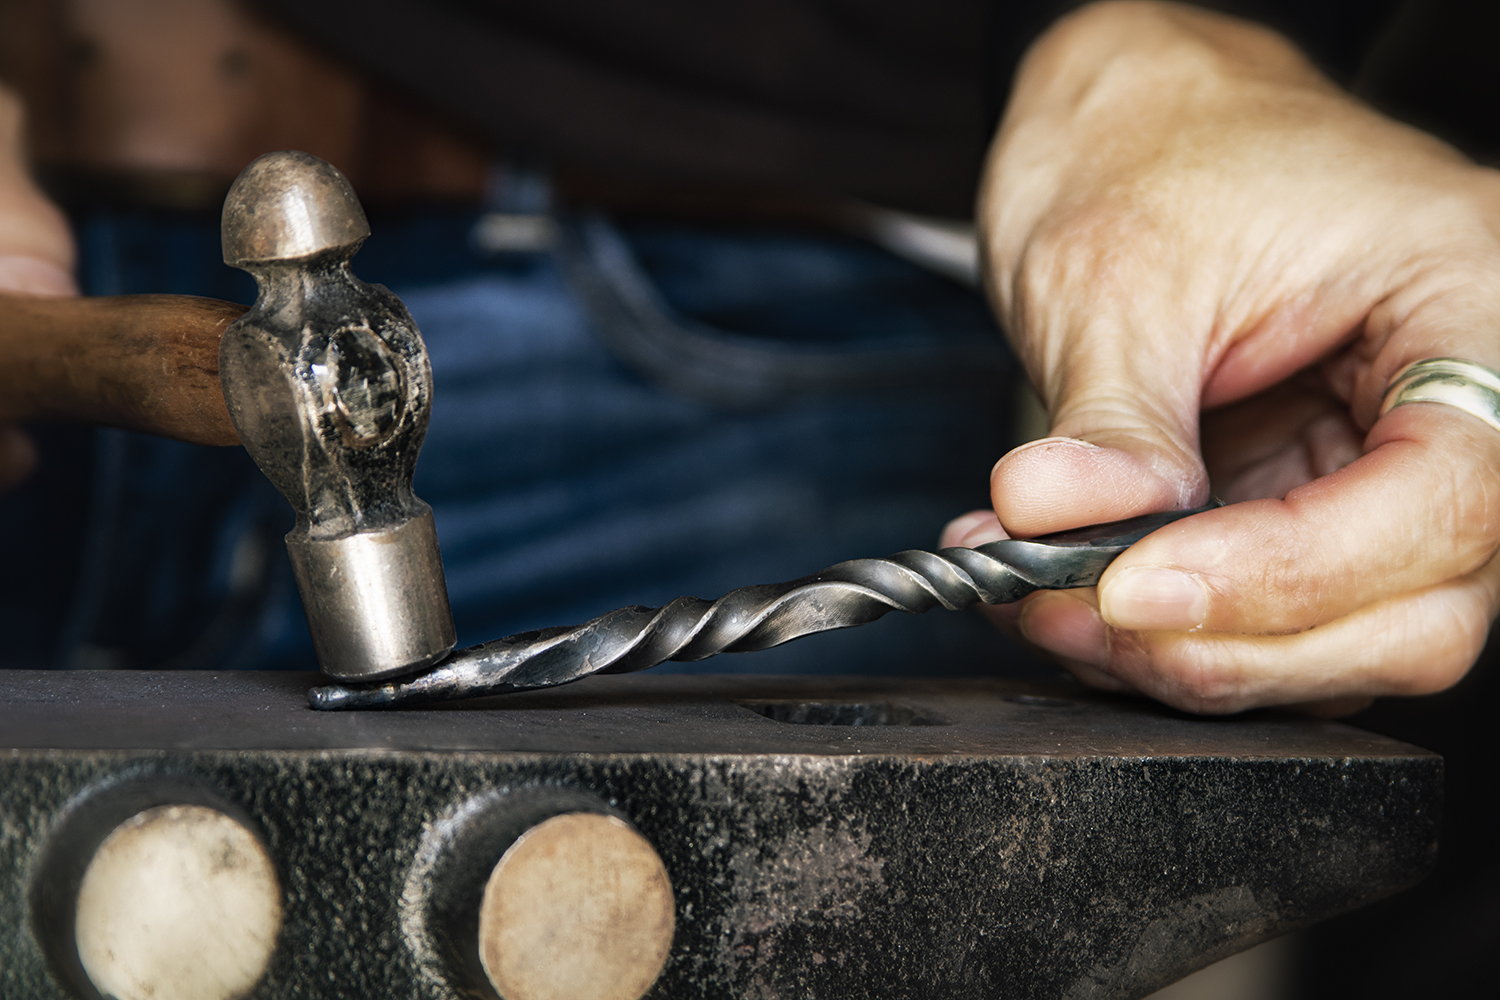
I’ve been playing around with steel.  I don’t have a welder and have never welded steel, but it’s something I think would help create a lot of art.  For now I’m just pounding away at hand forged pieces with no welding involved.    In reality the same ideas or base principles can be applied to blacksmithing as I have learned for precious metals such as silver, gold and platinum. The main difference I have found is that ferrous metals such as steel is worked hot while the non ferrous metals such as silver, etc are worked cold. I really like pounding away at something like metal. It’s actually quite relaxing and fun. You get to see the metal transform slowly before your eyes. For me blacksmithing is something I’m just starting to experiment with and I find it harder to work in the sense that for me it’s a pain to keep hot all the time while I work it. Silver and gold is so much easier to work cold and then heat up to anneal it.

So here is an image of me pounding away at some metal. I make a Fairy Hair Pin in a similar manner. It’s pretty much my first product that I make and sell in steel. It’s not too hard to make and it’s fun. I love how it turns out every time. Each one is unique or at least the scroll and hammer marks are always slightly different. The small twist near the back end is made by taking the round rod and hammering a section flat and then twisted in just that area. Both ends of the hair pin are hammered to a point that involves hammering the tips of the rod into a pyramid shape flat on all four sides. You keep drawing the tips out like this until the desired length and thickness is desired. Then the edges are rounded back out so that the tips are then rounded. The scroll on the end is the funnest part. I like slowly bending and rolling the tip upon itself while red hot. It’s so interesting how metal is so hard until heated hot enough. While red hot it bends like butter. Love it. These hair pins are then finished with a hammered finish and a bees wax seal to keep moister out so they don’t rust. A true fairy hair pin that looks great when worn. As a side note, these pins can also be used as a level of protection. They are well made and strong so I’m just saying that it could be used as a weapon too, but you didn’t hear that from me.

So I hope to create more blacksmithing products. I’ll be sharing more of my ideas as I create them. I hope that you’ll stay tuned to see my new ideas as I evolve as an artist. I love to make functional art. Lets hope that it’s both beautiful and functional. I mean what is the use of having something you like and not be able to use it? Blacksmithing to me is another fun way to help create just that.

Blacksmithing

Blacksmithing

tags: Blacksmithing, Silversmithing, metal working, DanaArts, hot working metal, handforged metal, Fair Hair Pin, Hair Pin, Hair stick
categories: Updates, All Jewelry Related
Friday 05.17.19
Posted by Dana Thorup
 

Paradise Visit 2019

I recently this past weekend got together with a bunch of friends that grew up with me in Paradise. We were able to visit our childhood homes and see what has happened to our homes (Paradise will always have a place in our hearts). All I can say is I don’t have words to express the magnitude of what happened. All the stories and difficulties that have happened and are still happening. For each and everyone of us our experience is different and personal. It hits us in different ways. Ways we are not even aware of until those feelings come rushing in. For me there are many triggers, but at the moment it’s nostalgia of childhood friends thinking of past and present and this chimney. Why this chimney? This was the chimney where my families Christmas stockings would be hung across a wooden beam mantle. The kitchen table was right in front of it. A place that brings back so many memories. Although this picture is sad, my memories are not. My friends and I no longer live in Paradise, but some of us still had family there and we all have lots of memories there. I like how my friend more or less put it. Our visit was a bit sobering and we were absorbing both past memories while being confronted with the present destruction right before us. Those two things made it hard.

It was an enjoyable time with my friends. I had not seen them for over 25 years. It was like we were never separated. We got together and it was like good old times. I just wish it were for a different reason, but this has brought us closer together and I feel we will make more of an effort to have small reunions more often. I can’t wait.

Is this goodbye to Paradise forever? Not for me. I have family in Chico so I’ll be around every now and then. Paradise, CA will never be the same though. Homes, people and the environment will all change. I can see a slow rebuild happening in the future, but my little home town is lost, how I know it, forever. In memories it will live on and have a special place in my heart forever.

Chimney of the house I grew up in - Paradise, CA April 2019

Chimney of the house I grew up in - Paradise, CA April 2019

tags: Paradise camp Fire, Paradise California, Paradise, Paradise Closure, Novemeber 8, Camp Fire, Memories, Childhood friends, Paradise Camp Fire, Camp Fire Nov. 8 2018
categories: Updates, Photography
Friday 04.19.19
Posted by Dana Thorup
 

Gardening

I love gardening.  What does a gardener do when he has no garden?  Rips out his grass and starts planting. Ok so I’m re doing my yard and planting season already began which means planting in the grass was the best I could do on short notice.  I actually have to tear out all the grass one one side of the yard.  No easy task.  The yard has two large patches of grass.  One side I’ll keep and expand.  The other side gets torn out and turned into a garden.  I have way to much growing in such a little space right now, but I could not wait.  It will improve over the years to come. 


This image shows some of what has started to grow. I can’t wait. I love to see them grow everyday. I could just be outside and stare into space/garden and dream. lol If you have any gardening tips, I’d love to hear them. I love hearing how others garden. It’s a wonderful time of year to be outside.

Pak Choy

Pak Choy Toy Choy

tags: Pak Choy, Garden, Gardening, Dana Arts
categories: Gardening
Thursday 03.28.19
Posted by Dana Thorup
Comments: 1
 

Old PC Computers headache

So for all my CAD work I need a decent computer.  Basically they are great gaming computers, but that’s just a plus.  Anyway, mine is starting to get old, but hopefully can hang on a few more years.  

It’s interesting to see my last computer I had built for CAD years ago.  It still had windows xp on it.  At one point it was a great computer.  It’s amazing  how technology advances because now we can’t even use this computer because nothing works on it.  I decided to put window 7 on it.  Digging through boxes I found windows 98, xp, and 2000 discs.  Even an unopened xp disc.  Lol. Anyway I had to flash the bios with the latest update to install 7 and things were great after that.   Looking for drivers I found out that my motherboard supported a 64bit system.  So I installed windows 7 64 bit.  As I installed drivers and updates things went bad.  Computer would freeze a lot and lots of dreded blue screens.  It was a nightmare.  I re wiped the drive and tried again with different results, but still a nightmare so I tried the 32bit version of windows.  At last it works like it should.  Better than xp, but I still wish the 64bit version would have worked.  


So you might be wondering why I write about this.  I don’t know.  It was just on my mind.  Well I learned that even though my computer parts supposedly supported the 64bit system I’m sure the builders could not see the future and something about the new drivers didn’t like old parts.  For now we have a simple computer that the kids can do homework on or play some games that might still work on a 32bit system.  I also learned that a blue screen doesn’t nessisarily mean the hardware is bad.  It might just mean that the OS can’t handle the old hardware.  

tags: Issues with PC, Windows 7, Computer hardware, Computer repair, Computer, PC computer, Blue screen
categories: Updates
Tuesday 02.19.19
Posted by Dana Thorup
 
Newer / Older

Dana Arts 2024